rpi4b-ubuntu create cloudflare tunnel
In this article I have recorded the journal of the installation of cloudflared and the basic configuration of the tunnel route service. It's just a diary for future reference.
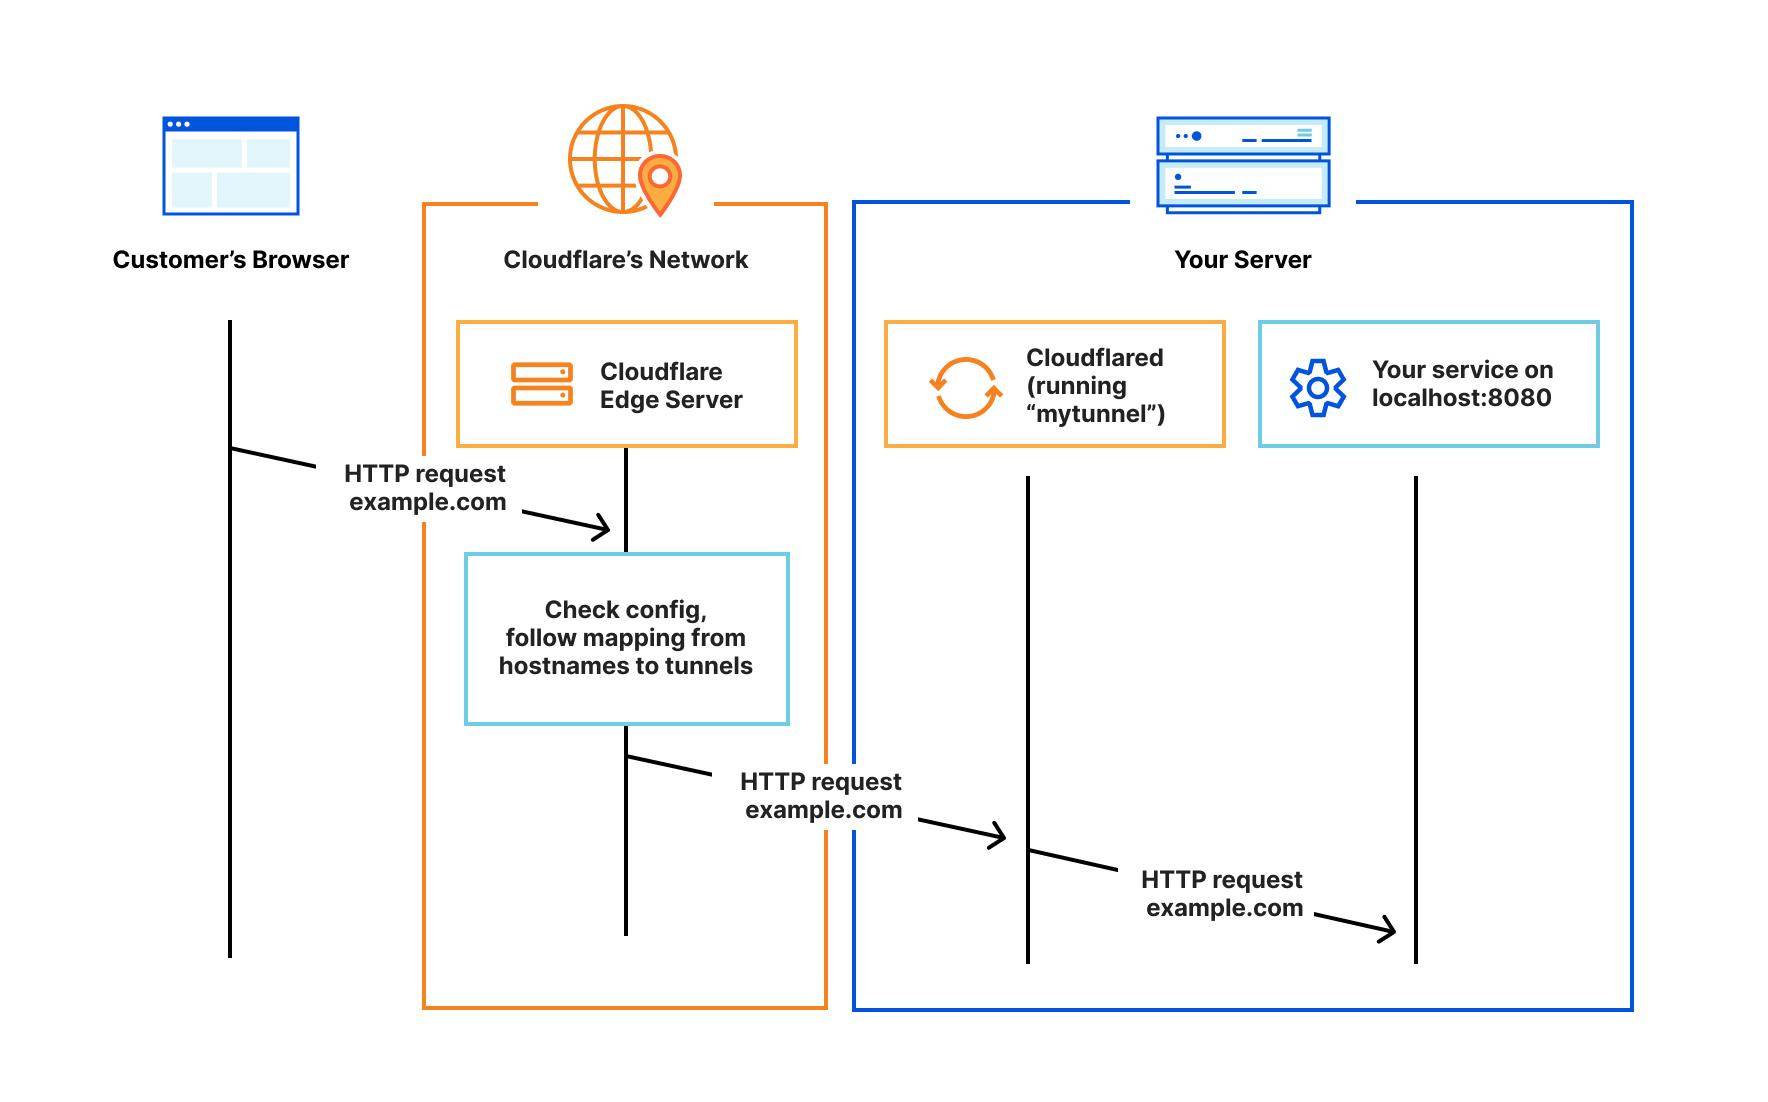
Cloudflare Tunnel provides you with a secure way to connect your resources to Cloudflare without a publicly routable IP address. With Tunnel, you do not send traffic to an external IP — instead, a lightweight daemon in your infrastructure (cloudflared) creates outbound-only connections to Cloudflare's global network. Cloudflare Tunnel can connect HTTP web servers, SSH servers, remote desktops, and other protocols safely to Cloudflare. This way, your origins can serve traffic through Cloudflare without being vulnerable to attacks that bypass Cloudflare.
Refer to our reference architecture for details on how to implement Cloudflare Tunnel into your existing infrastructure.
How it works?
Cloudflared establishes outbound connections (tunnels) between your resources and Cloudflare's global network. Tunnels are persistent objects that route traffic to DNS records. Within the same tunnel, you can run as many ‘cloudflared’ processes (connectors) as needed. These processes will establish connections to Cloudflare and send traffic to the nearest Cloudflare data center.
Create a remotely-managed tunnel (dashboard)
Create a locally-managed tunnel (CLI)
- Download and install cloudflared
- Authenticate cloudflared
- Create a tunnel and give it a name
- Create a configuration file
- Start routing traffic
- Run the tunnel
- Check the tunnel
Prerequisites#
Before you start, visit cloudflare and sign up/log in, make sure you:
- Register a domain on Cloudflare or Transfer your domain to Cloudflare from another domain provider.
- Add a website to Cloudflare using your hosted or transferred domain.
- Change your domain nameservers to Cloudflare.
Here is some platform background information.
$ echo $MACHTYPE
aarch64

$ arch
aarch64

$ cat /etc/issue
Ubuntu 22.04.4 LTS \n \l

# cat /etc/os-release
$ lsb_release -a
No LSB modules are available.
Distributor ID: Ubuntu
Description:    Ubuntu 22.04.4 LTS
Release:    22.04
Codename:   jammy

$ uname -a
Linux rpi4b-ubuntu 5.15.0-1055-raspi #58-Ubuntu SMP PREEMPT Sat May 4 03:52:40 UTC 2024 aarch64 aarch64 aarch64 GNU/Linux
Make sure your network is connected to the outside world:
$ curl google.com
<HTML><HEAD><meta http-equiv="content-type" content="text/html;charset=utf-8">
<TITLE>301 Moved</TITLE></HEAD><BODY>
<H1>301 Moved</H1>
The document has moved
<A HREF="http://www.google.com/">here</A>.
</BODY></HTML>
Install cloudflared#
Use the apt package manager to install cloudflared on ubuntu platform.
Try apt search cloudflared, there's no package source available.
- Add Cloudflare's package signing key:
$ sudo mkdir -p --mode=0755 /usr/share/keyrings
$ curl -fsSL https://pkg.cloudflare.com/cloudflare-main.gpg | sudo tee /usr/share/keyrings/cloudflare-main.gpg >/dev/null
- Add Cloudflare's apt repo to your apt repositories:
$ echo "deb [signed-by=/usr/share/keyrings/cloudflare-main.gpg] https://pkg.cloudflare.com/cloudflared $(lsb_release -cs) main" | $ sudo tee /etc/apt/sources.list.d/cloudflared.list
- Update repositories and install cloudflared:
$ sudo apt-get update
$ apt search cloudflared
Sorting... Done
Full Text Search... Done
cloudflared/unknown,now 2024.3.0 arm64
Cloudflare Tunnel daemon
$ sudo apt-get install cloudflared
Run cloudflared -V to check version info after installation.
Run cloudflared -h for a quick help.
$ cloudflared -h
NAME:
   cloudflared - Cloudflare's command-line tool and agent

USAGE:
   cloudflared [global options] [command] [command options]

VERSION:
   2024.3.0 (built 2024-03-20-1012 UTC)

DESCRIPTION:
   cloudflared connects your machine or user identity to Cloudflare's global network.
     You can use it to authenticate a session to reach an API behind Access, route web traffic to this machine,
     and configure access control.

     See https://developers.cloudflare.com/cloudflare-one/connections/connect-apps for more in-depth documentation.

COMMANDS:
   update     Update the agent if a new version exists
   version    Print the version
   proxy-dns  Run a DNS over HTTPS proxy server.
   tail       Stream logs from a remote cloudflared
   service    Manages the cloudflared launch agent
   help, h    Shows a list of commands or help for one command
   Access:
     access, forward  access <subcommand>
   Tunnel:
     tunnel  Use Cloudflare Tunnel to expose private services to the Internet or to Cloudflare connected private users.
Useful commands lists the most commonly used commands for managing local tunnels.
Login for auth#
Run cloudflared tunnel login in terminal:
$ cloudflared tunnel login
Please open the following URL and log in with your Cloudflare account:

https://dash.cloudflare.com/argotunnel?aud=&callback=https%3A%2F%2Flogin.cloudflareaccess.org%2Fg_ozOCSL8XaKimCuXRlL-VzruhyHqB7HbK9cFqm_9Rg%3D

Leave cloudflared running to download the cert automatically.

Your browser will download the certificate instead. You will have to manually
copy it to the following path:

/home/pifan/.cloudflared/cert.pem
If you're on a host machine that's not SSHing, the cloudflared terminal will pull up the default browser and open the URL automatically. Otherwise, you should manually click and open the login URL in a browser, following the tips for choosing an active domain for your new cloudflare tunnel.
Click Next. If nothing is wrong, the web page will congratulate you on your success.
Success
Cloudflared has installed a certificate allowing your origin to create a Tunnel on this zone.

You may now close this window and start your Cloudflare Tunnel!
For further confirmation, you can log in again.
$ cloudflared tunnel login
Please open the following URL and log in with your Cloudflare account:

https://dash.cloudflare.com/argotunnel?aud=&callback=https%3A%2F%2Flogin.cloudflareaccess.org%2FLSNCguubG5Zzmkh2nQF94leHhq6At7p4C6fX4m8NSjw%3D

Leave cloudflared running to download the cert automatically.
You have successfully logged in.
If you wish to copy your credentials to a server, they have been saved to:
/home/pifan/.cloudflared/cert.pem
After this step, the browser will automatically download the certificate locally as ~/.cloudflared/cert.pem.
Create a tunnel#
Run cloudflared tunnel create <TUNNEL_NAME> to create a named tunnel, e.g. cft:
$ cloudflared tunnel create cft
Tunnel credentials written to /home/pifan/.cloudflared/79983784-9f0c-4fd7-b28c-cbdfc066f584.json. cloudflared chose this file based on where your origin certificate was found. Keep this file secret. To revoke these credentials, delete the tunnel.

Created tunnel cft with id 79983784-9f0c-4fd7-b28c-cbdfc066f584
From the above output, take note of the tunnel's UUID and the path to your tunnel's credentials file.
Confirm that the tunnel has been successfully created by running cloudflared tunnel list:
$ cloudflared tunnel list
You can obtain more detailed information for each tunnel with `cloudflared tunnel info <name/uuid>`
ID                                   NAME   CREATED              CONNECTIONS
79983784-9f0c-4fd7-b28c-cbdfc066f584 cft 2024-03-24T10:15:39Z
Run cloudflared tunnel info <name/uuid> to obtain more detailed information:
$ cloudflared tunnel info cft
Your tunnel 79983784-9f0c-4fd7-b28c-cbdfc066f584 does not have any active connection.
Log in to Zero Trust / Cloudflare One and go to Networks > Tunnels to view the newly created tunnel.
Init Configuration#
In your .cloudflared directory, create a config.yml file using any text editor.
Assuming you have installed nginx and configured TCP:81 for the exposed web server, then init your config like this:
tunnel: cft
credentials-file: /home/pifan/.cloudflared/79983784-9f0c-4fd7-b28c-cbdfc066f584.json
url: http://localhost:81
If you are exposing a private network to end users running WARP, you need to add the
warp-routingkey and set it totrue.
You can now route traffic to your tunnel using Cloudflare DNS or determine who can reach your tunnel with Cloudflare Access.
Start route dns#
Now assign a CNAME record that points traffic to your tunnel subdomain.
If you are connecting an application, route the service to a public hostname:
hostname is the domain name selected in the Authorize Cloudflare Tunnel login step.
If a resolution record already exists for the root(first-level) domain name, it will prompt that it is occupied.
$ cloudflared tunnel route dns cft dummy.com
Failed to add route: code: 1003, reason: Failed to create record dummy.com with err An A, AAAA, or CNAME record with that host already exists. For more details, refer to <https://developers.cloudflare.com/dns/manage-dns-records/troubleshooting/records-with-same-name/>.
In this case, remove the existing DNS root domain name resolution record or change it to a second-level domain name such as a.dummy.com.
$ cloudflared tunnel route dns cft a.dummy.com
2024-03-24T10:29:48Z INF Added CNAME a.dummy.com which will route to this tunnel tunnelID=79983784-9f0c-4fd7-b28c-cbdfc066f584
Open Cloudflare Dashboard, click on Websites to enter the domain name dummy.com's management interface, click DNS - Records in the left panel, and you can see that a new CNAME record has been added.
| Type | Name | Content | Proxy status | TTL |
|---|---|---|---|---|
| CNAME | dummy.com | 79983784-9f0c-4fd7-b28c-cbdfc066f584.cfargotunnel.com | Proxied | Auto |
If the domain name is used exclusively for Cloudflared Tunnel mapping, you can change the name to a wildcard character * to facilitate subsequent configuration of subdomains mapping multiple intranet services.
Run the tunnel#
Run the tunnel to proxy incoming traffic from the tunnel to any number of services running locally on your origin.
If your configuration file has a custom name or is not in the .cloudflared directory, add the --config flag and specify the path.
Ok, just run tunnel cft with the standard default config.yml.
$ cloudflared tunnel run cft
2024-03-24T11:52:43Z INF Starting tunnel tunnelID=79983784-9f0c-4fd7-b28c-cbdfc066f584
2024-03-24T11:52:43Z INF Version 2024.3.0
2024-03-24T11:52:43Z INF GOOS: linux, GOVersion: go1.21.5, GoArch: arm64
2024-03-24T11:52:43Z INF Settings: map[cred-file:/home/pifan/.cloudflared/79983784-9f0c-4fd7-b28c-cbdfc066f584.json credentials-file:/home/pifan/.cloudflared/79983784-9f0c-4fd7-b28c-cbdfc066f584.json url:http://localhost:81]
2024-03-24T11:52:43Z INF cloudflared will not automatically update if installed by a package manager.
2024-03-24T11:52:43Z INF Generated Connector ID: 2b1c5d5e-05d8-446c-b8e6-fae357637581
2024-03-24T11:52:43Z INF Initial protocol quic
2024-03-24T11:52:43Z INF ICMP proxy will use 192.168.0.124 as source for IPv4
2024-03-24T11:52:43Z INF ICMP proxy will use fe80::dea6:32ff:fed1:33d3 in zone wlan0 as source for IPv6
2024-03-24T11:52:44Z INF Starting metrics server on 127.0.0.1:44505/metrics
2024/03/24 11:52:44 failed to sufficiently increase receive buffer size (was: 208 kiB, wanted: 2048 kiB, got: 416 kiB). See https://github.com/quic-go/quic-go/wiki/UDP-Buffer-Sizes for details.

...
If you want to get information about the tunnel you have just activated, you can run cloudflared tunnel info <name/uuid> at any time.
At this moment, try visiting https://yummy.com/(or https://a.yummy.com/) in a browser, you should see the web page content just like the output of curl localhost:81 locally.
Run as servcie#
Cloudflare Tunnel can install itself as a system service on Linux and Windows and as a launch agent on macOS. For more information, refer to run as a service.
Run cloudflared as a service
- Install the cloudflared service:
cloudflared service install - Start the service:
systemctl start cloudflared - (Optional) View the status of the service:
systemctl status cloudflared
Before installing, you can check the service status to make sure it's not installed.
installation#
Running cloudflared service install without specifying a config will fail with the prompt "Cannot determine default configuration path".
$ sudo cloudflared service install
Cannot determine default configuration path. No file [config.yml config.yaml] in [~/.cloudflared ~/.cloudflare-warp ~/cloudflare-warp /etc/cloudflared /usr/local/etc/cloudflared]
So, specify your current config.yml path to install the service.
This time, the service should install successfully as expected.
$ sudo cloudflared --config /home/pifan/.cloudflared/config.yml service install
2024-03-24T12:48:09Z INF Using Systemd
2024-03-24T12:48:14Z INF Linux service for cloudflared installed successfully
If you list the /etc/systemd/system/ directory, you'll see that three new items have been added.
$ ls -l /etc/systemd/system/ | grep cloud
drwxr-xr-x 2 root root 4096 Oct 13  2021 cloud-final.service.wants
-rw-r--r-- 1 root root  294 Mar 25 13:10 cloudflared.service
-rw-r--r-- 1 root root  248 Mar 25 13:10 cloudflared-update.service
-rw-r--r-- 1 root root   98 Mar 25 13:10 cloudflared-update.timer
Run systemctl status cloudflared to check the status of the service, the ~/.cloudflared/config.yml has been copied as /etc/cloudflared/config.yml and passed to the --config option for the root service daemon.
$ systemctl status cloudflared
● cloudflared.service - cloudflared
     Loaded: loaded (/etc/systemd/system/cloudflared.service; enabled; vendor preset: enabled)
     Active: active (running) since Sun 2024-03-24 12:48:14 UTC; 17s ago
   Main PID: 77682 (cloudflared)
      Tasks: 10 (limit: 9244)
     Memory: 17.6M
        CPU: 484ms
     CGroup: /system.slice/cloudflared.service
             └─77682 /usr/bin/cloudflared --no-autoupdate --config /etc/cloudflared/config.yml tunnel>

Mar 24 12:48:14 rpi4b-ubuntu systemd[1]: Started cloudflared.
Try visiting https://yummy.com/(or https://a.yummy.com/) in a browser to see if the tunnel is working well.
maintenance#
Note that if you make changes to the configuration file for the given tunnel, do update the service --config /etc/cloudflared/config.yml.
update config file
Configuration file - Update a configuration file - cloudflared replicas
Allow for reloading/changing configuration without dropping all tunnels? · Issue #301
FEATURE REQUEST - Hot swap/update config without restarting cloudflared · Issue #512
You can now route traffic through your tunnel. If you add IP routes or otherwise change the configuration, restart the service to load the new configuration:
To run multiple instances for a systemd service unit, refer to the following:
- ubuntu - How to manage multiple instances of a batch job using systemd?
- daemon - Start N processes with one systemd service file
- Systemd start multiple instances with main control
- Run multiple instances of the same systemd unit
- Manage multiple service instances with systemctl
- Manage multiple systemd service instances
You can stop/disable or uninstall cloudflared.service when not needed.
$ sudo systemctl stop cloudflared
$ sudo systemctl disable cloudflared

$ sudo cloudflared service uninstall
2024-03-24T18:28:09Z INF Using Systemd
2024-03-24T18:28:14Z INF Linux service for cloudflared uninstalled successfully
Run ls -l /etc/systemd/system/ | grep cloud. The only item left is cloud-final.service.wants.
Finally, if you don't need the tunnel any more, just delete it.
references#
Tunnel logs - ubuntu: /var/log/syslog
Cloudflare Tunnel体验
使用Cloudflare做HTTP内网穿透
Cloudflare内网穿透代理折腾备忘
CloudFlare Tunnel 免费内网穿透的简明教程
Debian - 服务在家中,白嫖 Cloudflare 的公网 IP
rpi4 - Cloudflare Tunnel 免费内网穿透
rpi4b+ubuntu - Cloudflare Tunnel不完全上手指南
Cloudflare Tunnel on Raspberry Pi: Web Server for My Home
Setting up a Cloudflare Tunnel on the Raspberry Pi - Pi My Life Up